I like to minimise waste where I can – and plastic wrap has got to be the definition of single use plastic waste. In honour of plastic-free July I decided to have a go at making my own eco-friendly re-useable beeswax wraps.
A quick google search found a number of tutorials and two different methods. I tried both methods to see which I liked the most.
We’ve now been using the wraps I made for a couple of months – I don’t know how we ever lived without them!
What are beeswax food wraps?
Beeswax food wraps are wax coated fabric squares (actually you can make any shape you want) that cover and wrap food instead of using disposable plastic wrap.

Why use beeswax food wraps?
To minimise waste by replacing single use plastic wrap and ziplock bags in your kitchen with a re-useable alternative.
I often make pies, quiches and roast vegetables in the oven, which are enough for two meals for our little family. Rather than using plastic wrap to cover leftovers in the fridge, I use my grandmother’s trick of popping a plate over the top.
Then the smallest person in the house started yanking the fridge door open, and I became worried about dishes toppling off and onto the floor.
I needed an alternative.
Too many dirty dishes are made decanting leftovers into containers for the fridge and then again into oven-safe ones for reheating.
It would also be useful to have some smaller wraps to pop over the bowls in our dinner set or wrap half an avocado or lemon in.
How to use beeswax wraps
Use them just like you would plastic wrap.
Place over dishes and use the warmth from your hands to gently mold the wrap so it sticks to itself and the dish. Wrap around half used fruit or veggies or fold around baked goods.
Use them instead of ziplock bags for food on the go.
I fold little ‘envelopes’ around nuts and raisins for a portable snack for my daughter. You can find lots of folding ideas on you-tube.
We get a lot of flies in Australia and I use them all the time just to lightly cover food while I’m prepping – pop one over a bowl or tuck around a plate.
Don’t use wraps in the oven or microwave – they’ll melt or burn. And wait for dishes to be cool enough to touch before placing your wrap over.
How to clean beeswax wraps
Simply wash them like a plate – wipe with a sponge and mild soap – I use liquid castile soap for dishwashing liquid. Then rinse them with cool water and prop them against something to air dry or peg them on a line.
How to store beeswax wraps
You can store them folded or rolled in a drawer. I use them so much I like them on hand, so I keep them flat and slide them against the chopping boards leaning on the wall next to the fridge.

What are beeswax wraps made with?
Most wraps you can buy use beeswax, tree resin and oil – often jojoba or almond oil on cotton. Beeswax is antibacterial and the tree resin and oil are anti-fungal and help make the wraps more pliable. I’m not using mine for meat or cheese, in fact most of the time the wrap is stretched over a dish, rather than in direct contact with food, so I decided to go with a 100% wax option.
How long do beeswax wraps last?
These should last for about a year but it will depend on how you use them, how frequently you use them and how you care for them.
Wraps often molded around items or folded into packets will wear more quickly than ones sitting on top of bowls and plates.
It is normal for them to get creases and slight stains (I’m looking at you beetroot).
I will re-wax mine if I need to, but when the fabric is starting to wear I can simply tear them up and add them to the compost pile.
Instructions: DIY Beeswax Food Wraps
You need:
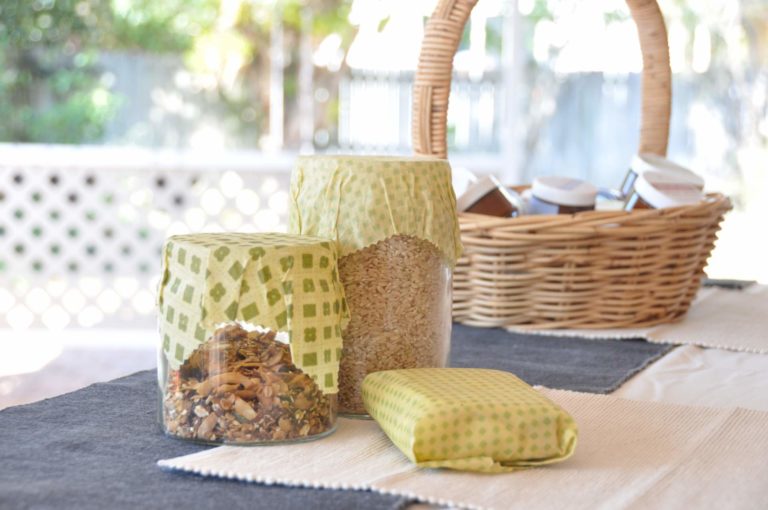
- Some 100% cotton fabric – breathable with a tight weave but thin enough to easily fold. There was a vintage pillowcase in my fabric pile. I thought the pale yellow and green colours and pattern would be enhanced by the beeswax. I cut off the seams, washed the fabric, dried it in the sun and cut it into squares with pinking shears, so the edges wouldn’t fray. One side of pillowcase made two sizes of square- three large ones big enough to cover my baking dishes and four smaller ones.
- Organic beeswax. You can use pellets or grate some yourself from a small block
- Greaseproof paper
- Oven
- Paintbrush and baking tray or an iron

Directions – Oven and brush method

Step 1. Heat your oven to 90 degrees Celsius. Beeswax melts at 80 degrees – any hotter and you could burn your fabric or your wax.
Step 2. Line your baking tray with greaseproof paper.
Step 3. Lay your fabric square on the greaseproof paper.
Step 4. Sprinkle fabric lightly and evenly with beeswax. Its better to use less than more as you can always add more, but if you use too much your wrap will be too heavy with wax to fold nicely.

Step 5. Bake for approximately 10 minutes.
Step 6. Remove from oven and check the coverage. Check if there are any parts of the fabric that have not been covered by the melted wax – they look dry. Brush the melted wax with the paintbrush to ‘wet’ any dry parts. If necessary sprinkle a little more wax on those parts and return to the oven for another few minutes.
Step 7. When you’re satisfied with the coverage, use some tongs to lift the fabric. Wave it in the air for a few moments to cool.
Step 8. Allow your wraps to cool completely before using.
While I was waiting for the wax to melt in the oven, I tried the iron method on the smaller squares.
Directions – Iron and greaseproof paper method
based on the tutorial from diynatural.com

Step 1. Place a sheet of greaseproof paper (larger than your wrap) on a hard surface near a power outlet.
Step 2. Plug in and heat your iron on a low setting – my iron only has three settings, so I used the lowest.
Step 3. Place your fabric square on the greaseproof paper
Step 4. Sprinkle your wax lightly and evenly over the fabric
Step 5. Place another sheet of greaseproof paper over the wax covered fabric
Step 6. Gently place your iron on the middle of the ‘sandwich’ and hold in place while the wax melts. Do this again in other places until your wax is all melted. Move the melted wax around the fabric, using the weight and shape of the iron, until it is completely covered.
Step 7. Quickly remove the top sheet of greaseproof paper. Lift up the fabric in the air to cool using tongs. If you wait too long the fabric will stick to the greaseproof paper.
Step 8. Allow to cool completely before using.
Results
Both methods are pretty easy but next time I will only use the oven method. Although I originally thought the iron method would be easier, it actually took more effort and made more of a mess to clean up. Also the coverage of the wax seems more uneven than on the oven ones, even though I used the weight of the iron to move the wax around evenly.
I still have the other half of the pillowcase which I will use to make wraps as gifts for my sisters. Next time I will finish the edges of my fabric with pinking shears after the wraps are waxed and cold. Cutting the fabric after waxing leaves a much cleaner line. I might also try using a little coconut oil alongside the beeswax for its anti-microbial properties and to soften the finish a little.
Do you use beeswax food wraps? Have you ever tried making your own? What method did you use? How did they turn out?
Will you have a go using one of the methods above?
Let me know if you have any questions.